Liquid floor (by special terminology – self-leveling self-leveling floor) is a unique innovative coating. This technology allows you to make a beautiful, reliable, functional floor with a person with minimal building skills. This article is intended to introduce, including through video, the basics of self-leveling self-leveling floor technology. The very process of preparing a self-leveling floor with their own hands is not so difficult with careful separation of the issue into components. Do self-leveling self-leveling floor with your own hands? The video will demonstrate that it is not difficult.
")
Preparatory stage
On this floor, you need to acquire the necessary tools and prepare the base of the floor for pouring leveling mixture.
The very first question, what tools you need to have on hand:
- capacity for preparation of construction mix for a floor (it is desirable with the rounded edges of the bottom);
- drill;
- mixing nozzle for a drill (sold in a number of hardware stores);
- spatula for application in corners and other inaccessible places;
- brush or roller for applying a primer;
- needle roller on a long handle;
- studded foot for the ability to move across the flooded floor.
")
In addition, to prepare the floor for work you need a vacuum cleaner, you can household. It is recommended for a vacuum cleaner to use a dust collector in order to avoid damage by stone dust. Also for work it is desirable to use a respirator and gloves.
The basis for a bulk floor has to be:
- without cracks and cracks;
- without garbage and dust (use a vacuum cleaner to remove small fractions of garbage, preferably at least 2000 W).
")
After cleaning the surface can be primed floors. Wait until the primer is completely dry before pouring the floor. If you do not have a primer, then you can use the same mixture, only diluted with water to a more liquid state. It should also be remembered that in the presence of a loose surface floor primer should be carried out twice.
Some experts recommend using a damper tape around the perimeter of the self-leveling floor. It is considered appropriate only with a significant thickness of the coating.
First you need to indicate that the floor is filled in at least 2 stages:
- “Rough” or leveling;
- Finishing.
The leveling stage is necessary, since the base almost always has irregularities. Especially in old houses. It is noticed that for two or three decades of operation, the center of the room “sags” by 5-15 mm relative to the perimeter. This “subsidence” is found even on concrete floors. For leveling, you can use solutions – gypsum or cement. Although the gypsum mixture has a lower specific weight (about 20%), cement is recommended for work more. Gypsum mix requires either a wooden base, or very dry concrete, or pouring over a warming material.
")
DIY technology for self-leveling self-leveling self-leveling self-leveling floor is easy. It does not matter what cement is better to choose. The 400th mark is sufficient, if only without impurities, as is sometimes the case with unscrupulous suppliers. Two nuances to consider:
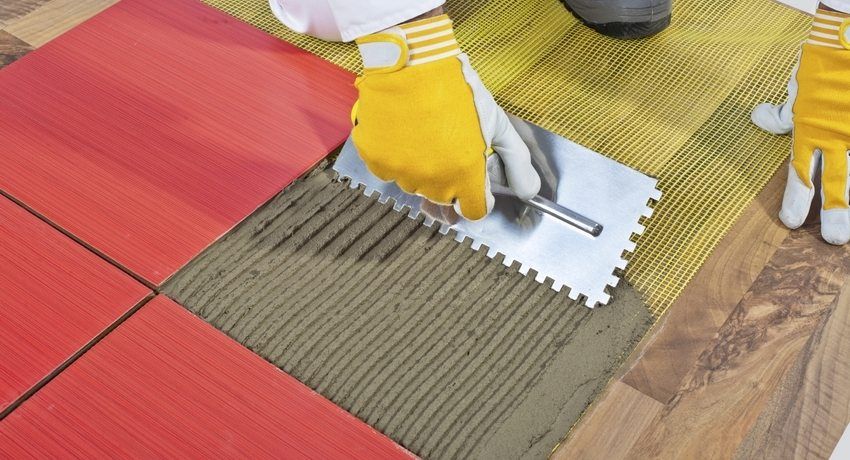
- Cement floor should be poured on the reinforcing mesh.
- Filling should be carried out over the entire surface of the floor. Filling only defective areas leads to the formation of “humps”, which does not give a universal zero level.
")
Helpful advice! It is recommended to fix the polypropylene net through 20-25 cm silicone in order to avoid “floating”.
As for the finishing self-leveling self-leveling floor, at this stage the technology is a little more difficult. However, with careful separation of the task is feasible for the implementation of their own hands. For clarity, the video captured the work of professionals.
")
For a start, the question is, which mixture is better to prefer? Which supplier to choose? What is the best time for hardening?
For convenience, the main brands of finishing mixtures are tabulated.:
| No. p / p | Name | Cure time | Layer thickness, mm | Consumption, kg / m2 |
| one | Eunice Horizon | 3-7 days | 2-100 | 3-4 |
| 2 | BOLARS | 3-4 hours | 2-100 | 3-4 |
| 3 | Vetonit | 3-4 hours | 1-5 | 1.5 |
| four | Perfecta Multilayer | 2-3 hours | 2-200 | 7-14 |
| five | Axton | 3-4 hours | 6-100 | 14-16 |
| 6 | Palafloor | 4-6 hours | 2-100 | 1.4-1.6 |
| 7 | GLIMS-S-Level | ? 24 hours | 2-5 | 3 |
Note 1. Consumption is indicated for a minimum expedient layer thickness of 5 mm.
In the selection process, pay attention not only to the value “consumption kg / m2“But also on the thickness of the layer on the label. Thickness can be specified in different ways and often in small print below. Some manufacturers indicate consumption in kg / mm / m2.
")
Note 2. The amount of material for self-leveling self-leveling floor (consumption per m2 in kg) in practice may differ from that stated by the manufacturer, therefore the mixture must be purchased with a reserve. In order to calculate the flow rate for sure, it is necessary to take the maximum value of the series of measurements in different places of the room for the layer thickness.
Note 3. Since the consumer is not so much interested in crystalline hardening as absolute solidification, you can use the rule 3/24. The rule states that for absolute solidification of every 3 mm of layer it is necessary 24 hours. It has been established by construction experience that after this period it is possible not only to impose a finishing decor (linoleum, carpet, etc.), but even to put furniture. It is not difficult to independently calculate that the 6 mm layer hardens in 48 hours, 15 mm in 5 days, etc.
")
Helpful advice! Be careful with quick-hardening mixtures, if you undertake to make a self-leveling floor with your own hands for the first time. To practice your skills, see how self-leveling self-leveling video floors are poured.
What self-leveling self-leveling floors better? By type of material floors are:
- epoxy;
- methyl methacrylate;
- cement acrylic;
- polyurethane.
")
All these types of floors are suitable for both residential and industrial premises. Although there is no consensus on which material is better to choose, a number of experts recommend pouring polyurethane floors. They are durable, waterproof, well absorb sounds. In addition, they combine shock resistance and elasticity, which is important when rearranging furniture. Indeed, in the place where there was heavy furniture, stable deformations are formed. It is nice to the eye when the deformations are aligned with time. You can, of course, imagine installing furniture once and for all, but it rarely happens. Usually, furniture at least once every five years still moves to new places. Finally, do not forget the fact that polyurethane floors are still the most eco-friendly and toxic fumes, and for subsequent disposal.
Directly finishing solution should be mixed in small batches, no more than 20 liters. Ideally, if there is a partner, mixing the solution, while you are laying. It is necessary to mix with a drill with a mixing attachment, since manual kneading is ineffective. Also, attempts to dilute the already crystallizing solution with water lead to quality losses. For your operational work on the video demonstrated outlined experience.
Pros and cons of self-leveling floors. Positive and negative feedback from owners about their quality and performance. Consumption of self-leveling floor per 1 square. meter: how to cut. Types of self-leveling floors.
Since the need to fill the floor with your own hands may occur at different times of the year, you should note that the working temperature range for most mixtures is 15-30 ° C. At low temperatures, water has time to decompose important chemical components, which reduces the strength. When high – water evaporates so quickly that it does not have time to complete leveling of the surface, that is, a “hedgehog” is formed.
")
It is necessary to stir it with a drill at low revs (300-500 rpm) by gradually adding powder to the water. Mixing time 3-4 minutes before the thickening of the solution. Then the solution should be “ripen” (residual microdispersive mixing during diffusion) for 5–10 minutes (check with the manufacturer).
Helpful advice! Although the technology is available for the execution of their own hands, yet for large areas (more than 40 m2) It is recommended to take in the help of an experienced specialist. At least in order to more accurately calculate the consumption of material.
If you save material consumption, note that the thickness of the finished solution in the thinnest place should not be less than 5 mm.
")
The application process itself is simple. This is essentially pouring the bucket on the floor. Of course, it is almost impossible to pour out the mixture to perfectly fill the corner. To “stretch” the mixture in the corner, use a spatula.
Now there is the final part of the work – deaeration. Often, when working with their own hands, this stage is forgotten. Neglect of this stage of work leads to the rise of air bubbles to the top, and as a result – the “lunar soil” of the surface. To effect deaeration, stock up on studded soles and pick up the needle roller correctly. A properly selected roller is considered to be one whose needle length exceeds the layer thickness by 1-2 mm. Then there is a mixing layer without a significant displacement of the mixture horizontally. In addition, the roller must be equipped with a splash shield. This will increase the material consumption by exactly 0.01%, but it will eliminate microdefects. Microdefects can cause drops of a solution frozen on the fly.
")
We hope that the recommendations on making self-leveling self-leveling floors with your own hands on video will help you.